Levers Portlet
Contents
What is a Lever
Levers are the pulldown menus that exist at the top of a dashboard pane. In DASH Community Edition, these levers are placed automatically on the page when you use the DASH page decorator. In DASH Professional - there is a Levers Portlet that allows for much more customization.
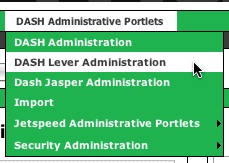
To Add, Update or Delete a lever - login as an administrator, select DASH Administration Portlets and click on DASH Lever Administration
The Lever Page
The Lever Page is displayed. This page displays all the Levers that have been added. The pencil icon on the left side of each row will edit that lever. The red circle on the right of each row will delete the lever. Click on the New Record link to enter a brand new lever into the system.
The Enter Levers Screen
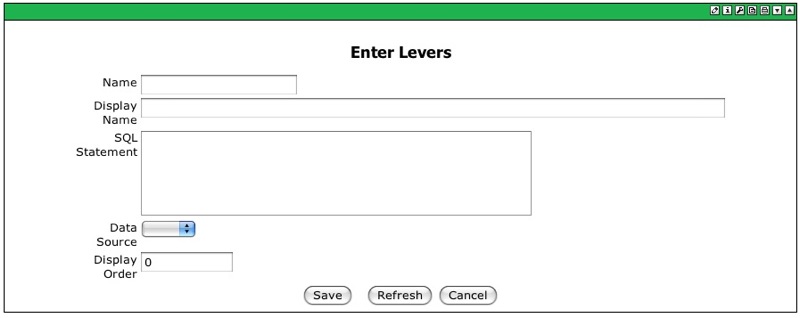
Clicking on the edit icon for a Lever or the New Record Link will display the Enter Levers Screen. Enter data into the following fields:
Name: - this is the name for the lever. It will be displayed on the Lever List and be referenced in SQL as $P{Name} Make it descriptive like Region, State, City, Customer - etc.
Display Name: - This name will appear on any page that you reference the lever. Leave this blank if you wish to use the Lever Name. You can also enter $P Values here if you wish to have the name displayed on the screen match a value selected in a previous lever.
SQL Statement: - enter a valid SQL query for the data source selected. This sql query must contain two values in the select clause - the first value is what is executed in the SQL for each portlet, the second appears in the Lever pull down on a dashboard pane.
Data Source - This determines what data source the SQL Statement uses. Click on the pulldown menu and select a datasource. These values are the datasources entered into the data source portlet - see Administration Portlets for additional information on adding datasources.
Display Order: - This field only used if you use the DASH decorator which places the levers automatically in the page. This number starts on the left - so a value of 1 will mean that this lever will display first on the page.
Click the SAVE button to store the Lever or CANCEL to start over. REFRESH is not used on this screen.
Completed Lever Entry
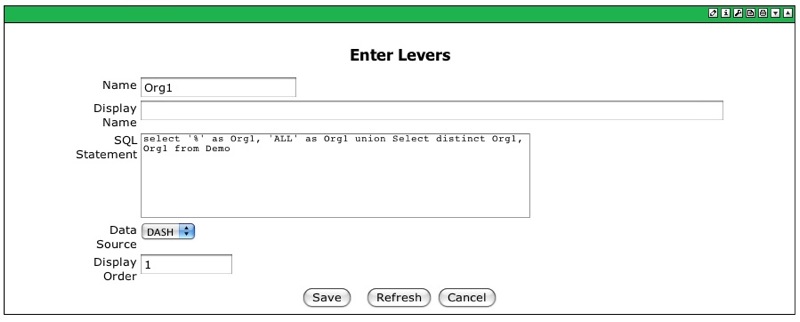
Here is a completed Lever Portlet entry. In this example the Name is Org1. There is no display name so the Name will appear if referenced on a dashboard pane
The Query will be against the DASH data source. The query places a wildcard of 'ALL' in the lever pulldown - and if selected will insert a wildcard character of '%'. This wildcard entry will be combined with the results of the union select statement. The value Org1 is listed twice (once for portlet sql and once for the display pulldown) in the select statement.
It will appear as the 1st lever from the left if the DASH decorator us used.
Lever Portlet
In DASH Professional we have created a Lever Portlet. This Portlet allows designers more control over where levers are displayed on a page, how levers display, what order they display and default values can be specified. The Levers Portlet can be added to any section on a page just like the chart, meter and report portlet.
Here is a set of levers that are displayed on a page. These were created by the following Levers Portlet.
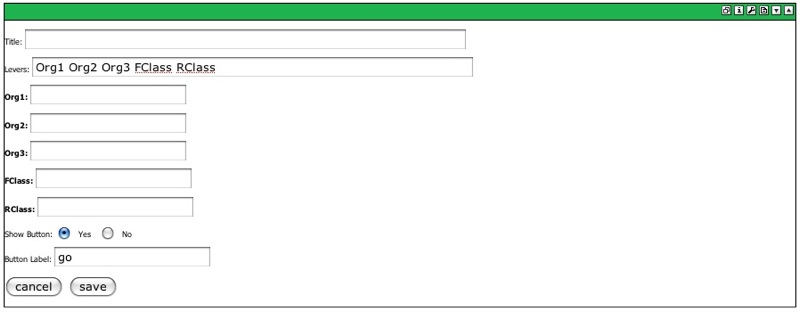
Clicking on the edit icon (pencil on upper right corner of the portlet) will display the Levers Portlet Screen. The following fields can be entered:
Title: Enter Text to display at the top of the Lever Portlet. The text is controlled by an entry in the marvelit.css file in the webapps/marvelit directory.
Levers: Enter the Lever Names to be displayed. Do not enter Display Names - they will be used when the levers are drawn. If you wish to wrap levers to appear on different lines in the portlet - separate
the names by
. For example Org1
Org2 Also - the levers will display in the order entered here - the display order is ignored.
Default Lever Values: For every entry in the Levers field - an entry will be displayed for a default value. If you want to set a default - enter the first value in the Levers SQL Query for that Lever. for example - for Org1 - the sql is Select '%', 'All' union select org1, org1 from demo so for All to be a default - enter % or enter a value for Org1 in the Org1 default lever value field.
Show Button: Select yes to display a button, select no if you do not want a button to display.
Button Label: Enter the text top be displayed on the button.
Create a Text Entry Lever
To create a blank entry box in the levers portlet - simply enter a lever name that has not been defined in the DASH Levers Administration page. Enter a name in the Levers Portlet - just like any other lever - just do not define it. When the levers are drawn on the page - an blank box will display with the Lever Name. The Display Name will not apply as it has never been defined.
You can still set default values, use
entries. The lever can be referenced in SQL by using a $P like the other levers. Since you can enter text you may want to reference these levers in your SQL with an IN clause as well.
Lever Portlet Preferences
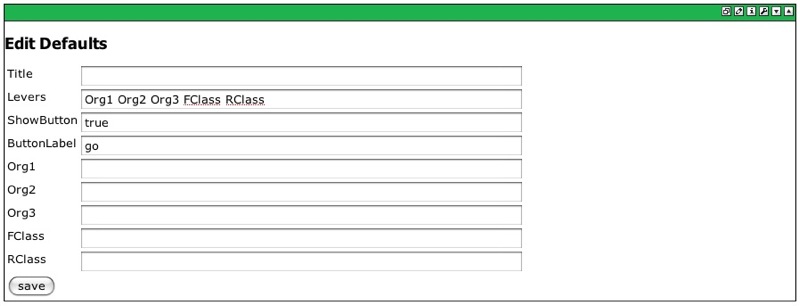
Preferences as set to enable pages to have the same behavior for all users. When a page is displayed - preferences are accessed in the database for the user/page combination. If that user has not accessed that page before than default preferences for the page are used. Thes have to be set for every portlet on a page. To add preferences - Click the Edit Defaults icon in the upper right corner of the Levers Portlet. It is next to the i (help) icon in the upper right corner of the portlet. The Edit Defaults Screen is displayed:
Enter the following:
Title: If a titlle was entered in edit mode - enter it here
Levers: Enter the Levers exactly like in edit mode - with
if used
ShowButton: enter true to display a button - false to not display a button
ButtonLabel: enter the text from the Button Label in edit mode
Lever Default Values: Enter a default for each lever entered in the Levers field
Click the Save button to save the preferences.
Once these entries are made - they are automatically added to the psml file for the page and will be available for all users.
