HTML Content Portlet
Contents
Add HTML to Your Pages
With DASH Professional - you can place custom HTML on any page by using the HTML Content Portlet You can utilize this portlet to do the following:
1. Add custom text to any page
2. Add javascript to add create unique controls and data entry fields
3. Add frames and link to other web pages for custom applications
4. Add virtually any HTML controls to your pages.
HTML Content Portlet
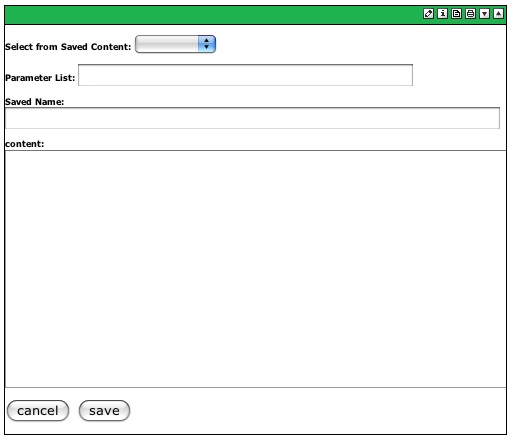
Add the HTML Custom Portlet to any section of your pages. The portlet opens in edit mode. Enter data in the following fields:
Select from Saved Content: Once a HTML Content Portlet is Saved - it is stored in a table in the DASH database. Select a value to add saved content.
Parameter List: Enter Lever names that will be used in the HTML Content Portlet. When you tab out of the field - default value entry boxes are displayed so you can enter default values.
Saved Name: Enter a name to reference the HTML Content. This is saved in the database and is displayed in the Select from Saved Content pulldown once saved.
content: Enter HTML or Javascript to be displayed/executed
IFRAME Example - embed Pentaho Report in DASH
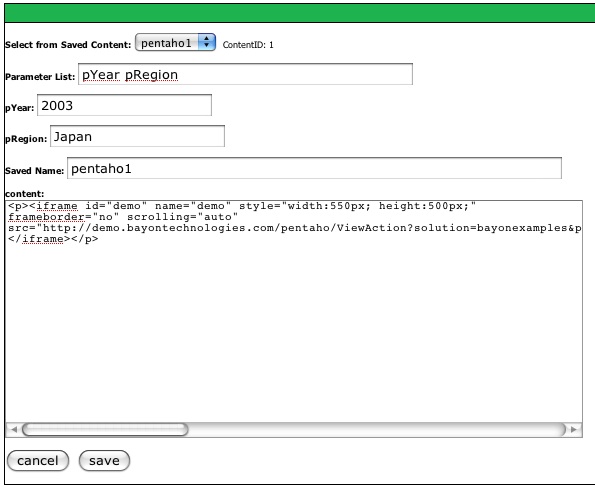
Here is a completed HTML Content Portlet that displays an iframe accessing a Pentaho Chart on a remote server. Levers are referenced in the Parameter List. The portlet displays areas for setting default values. The portlet content is saved in the database as pentaho1 with ContentID = 1.
The content is an html iframe command. When the page is displayed - the iframe is executed and the lever values are passed to the remote page. A Chart is generated and displayed on the DASH
page. The SRC tag of the HTML Content for this example is:
src="http://demo.xxx.com/pentaho/ViewAction?solution=xxxexamples&path=gidash
&action=chart_bar_revenue_by_productline.xaction®ion=$P{pRegion}&years=$P{pYear}&width=400&height=400">
Notice how the levers are passed to the remote page - $P{pRegion}&years=$P{pYear} - When users select those levers on the page and click the button - the page is refreshed and the new values are passed to the
remote page and used to generate the report.
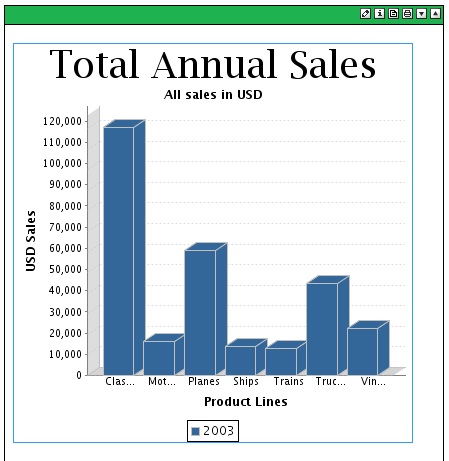
The above portlet - displays this chart on the DASH page.
IFRAME Example - embed Pentaho Pivot report in DASH
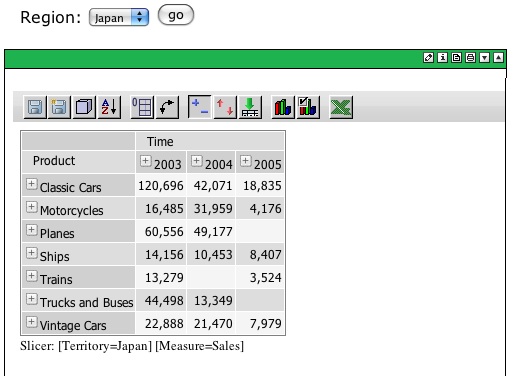
Here is a similar example that displays a pentaho pivot report:
The SRC tag of the HTML Content for this example is:
src="http://demo.xxx.com/pentaho/Pivot?solution=xxxexamples&path=gidash&action=pivot_sales_filter_region.xaction®ion=$P{pRegion}">
Set Lever by Adding Date Control Example
Here is an example of setting a Lever $P{TestDate} using the Marvelit Calendar Control:
The HTML content to produce the above lever is:
<form name="dateform" method="post"> Test Date: <input name="TestDate" type="text" value="$P{TestDate}" id="dateform_TestDate"> <a href="javascript:void(0)" onclick="if(self.dateform_TestDate_control)dateform_TestDate_control.fPopCalendar(document.dateform.TestDate);return false;" ><img name="popcal" align="absmiddle" src="/marvelit/cal/DateTime/calbtn.gif" width="34" height="22" border="0" alt=""></a> <iframe width=188 height=166 name="gToday:datetime:agenda.js:dateform_TestDate_control:plugins_date.jsp" id="gToday:datetime:agenda.js:dateform_TestDate_control:plugins_date.jsp" src="/marvelit/cal/DateTime/ipopeng.htm" scrolling="no" frameborder="0" style="visibility:visible; z-index:999; position:absolute; top:-500px; left:-500px;"></iframe><input type="submit" value="Go" name="submit"> </form>
HTML Content Portlet Preferences
Preferences as set to enable pages to have the same behavior for all users. When a page is displayed - preferences are accessed in the database for the user/page combination. If that user has not accessed that page before than default preferences for the page are used. Thes have to be set for every portlet on a page. To add preferences - Click the Edit Defaults icon in the upper right corner of the HTML Content Portlet. It is the icon next to the edit or pencil icon. The Edit Defaults Screen is displayed:


