Difference between revisions of "Install MARVELit WAR and build DASH tables"
Rmortensen (Talk | contribs) (→Macintosh, Linux or Unix) |
Rmortensen (Talk | contribs) (→Start-up and Shutdown) |
||
| Line 31: | Line 31: | ||
the marvelit schema - see the [http://wiki.marvelit.com/index.php?title=Data_Base_Preparation Data Base Preparation] section on how to accomplish this in mysql. | the marvelit schema - see the [http://wiki.marvelit.com/index.php?title=Data_Base_Preparation Data Base Preparation] section on how to accomplish this in mysql. | ||
Once again - the default DASH connection document assumes a user named "marvelit" with password of "marvelit" has access to the marvelit schema. | Once again - the default DASH connection document assumes a user named "marvelit" with password of "marvelit" has access to the marvelit schema. | ||
| − | |||
| − | |||
| − | |||
| − | |||
| − | |||
| − | |||
| − | |||
| − | |||
| − | |||
| − | |||
| − | |||
| − | |||
| − | |||
| − | |||
| − | |||
| − | |||
| − | |||
| − | |||
| − | |||
| − | |||
| − | |||
| − | |||
| − | |||
| − | |||
| − | |||
| − | |||
| − | |||
| − | |||
| − | |||
| − | |||
| − | |||
| − | |||
| − | |||
| − | |||
| − | |||
| − | |||
| − | |||
| − | |||
| − | |||
| − | |||
| − | |||
| − | |||
| − | |||
| − | |||
| − | |||
Revision as of 00:53, 10 October 2006
Installing the MARVELit War File
In your expanded DASHv2.0 folder, there is a file named marvelit.war. This file contains the
DASH applications and needs to be added to the Jetspeed portal environment. Jetspeed will automatically install these application on start-up, but the file needs to be placed in a specific folder in the installation for this to occur.
Copy and paste the marvelit.war file into the following directory (assuming you created a
"Jetspeed 2.1" folder during the Jetspeed installation):
/Jetspeed 2.1/webapps
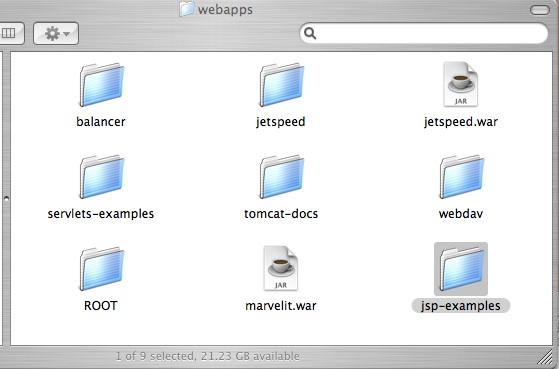
Here is a what the webapps folder should look like after this step. Once this file is in the webapps folder you can proceed to the next step.

Install JDBC Drivers
DASH uses JDBC to connect to all datasources. There are a number of places on any system that the JDBC driver may be installed in order to work with DASH. As a general rule, it is preferred to place the appropriate drivers for your data sources in the common/lib folder under your jetspeed installation. Using /Jetspeed 2.1 as the installation root - it would be /Jetspeed 2.1/common/lib. Placing your JDBC drivers there will ensure that DASH will always find them.
Creating the DASH SQL tables
DASH has 13 tables that need to be created in the sql database of your choice. In the DASHv2.0 folder - we have included a script named Create_DASH_Tables.sql. This script builds the tables for mysql. If you are using mysql - simply use the restore function in the MYSQL Administration application to create these tables.
The script places the tables in a schema called "marvelit". The default DASH connection document assumes this schema exists. Also - if you plan to use a different database other than mysql - the script will need modification.
After the tables are created in the schema you choose, set up a user "marvelit" with password "marvelit" to have complete access to the marvelit schema - see the Data Base Preparation section on how to accomplish this in mysql. Once again - the default DASH connection document assumes a user named "marvelit" with password of "marvelit" has access to the marvelit schema.